Como Instalar um Certificado SSL Grátis com Nginx e Let’s Encrypt
Fala pessoal, tudo bem por aí? Bom, hoje vamos ver Como Instalar um Certificado SSL Grátis com Nginx e Let’s Encrypt para deixar seus sites com aquele maravilhoso cadeadinho verde!
A princípio neste laboratório vamos precisar de um servidor Ubuntu 20.04 LTS, um IP válido aberto para o mundo da Internet e um Domínio válido para conseguir gerar o certificado SSL.
Antes de mais nada, todo esse conteúdo está no Youtube, confere aqui:
Instalação dos pacotes necessários
Antes de tudo, a primeira coisa que vamos fazer é instalar no nosso servidor de laboratório os pacotes necessários para conseguir ter um certificado SSL e um servidor web rodando, veja:
apt install nginx certbot python3-certbot-nginxAcima estamos instalando nosso maravilhoso Nginx como servidor web e o certbot, que é quem gera os certificados SSL para nós!
Ah, se você quiser ver a documentação do Certbot é só clicar aqui!
Então, agora precisamos acessar a pasta /etc/nginx/sites-available e dentro desse diretório vamos criar um arquivos chamado site.conf com o seguinte conteúdo:
server {
  # no lugar de coffops.com.br você precisar colocar o seu dominio
  server_name labs.coffops.com;
  listen 80;

  error_page 500 502 503 504 /50x.html;

  location / {
    root /var/www/html;
  }
}
Logo que temos nossa configuração do Nginx, vamos habilitar esse site criando um link simbólico que vai ficar dentro da pasta sites-enabled, veja:
ln -s /etc/nginx/sites-available/site.conf /etc/nginx/sites-enabled/Antes de tudo, podemos conferir se as configurações do Nginx estão corretas, e para isso use:
root@coffops-ssl-lab:/etc/nginx/sites-enabled# nginx -t
nginx: the configuration file /etc/nginx/nginx.conf syntax is ok
nginx: configuration file /etc/nginx/nginx.conf test is successful
root@coffops-ssl-lab:/etc/nginx/sites-enabled#
Agora sim, vamos reiniciar nosso servidor web para que as configurações que fizemos sejam aplicadas e para isso executamos o comando systemctl restart nginx!
Em seguida ,se você quiser conferir o status do serviço use o comando systemctl status nginx:
root@coffops-ssl-lab:/etc/nginx/sites-enabled# systemctl status nginx
● nginx.service - A high performance web server and a reverse proxy server
     Loaded: loaded (/lib/systemd/system/nginx.service; enabled; vendor preset: enabled)
     Active: active (running) since Sat 2022-06-04 03:41:46 UTC; 53s ago
       Docs: man:nginx(8)
    Process: 4357 ExecStartPre=/usr/sbin/nginx -t -q -g daemon on; master_process on; (code=exit>
    Process: 4365 ExecStart=/usr/sbin/nginx -g daemon on; master_process on; (code=exited, statu>
   Main PID: 4369 (nginx)
      Tasks: 2 (limit: 1132)
     Memory: 2.6M
     CGroup: /system.slice/nginx.service
             ├─4369 nginx: master process /usr/sbin/nginx -g daemon on; master_process on;
             └─4370 nginx: worker process
Configuração de DNS
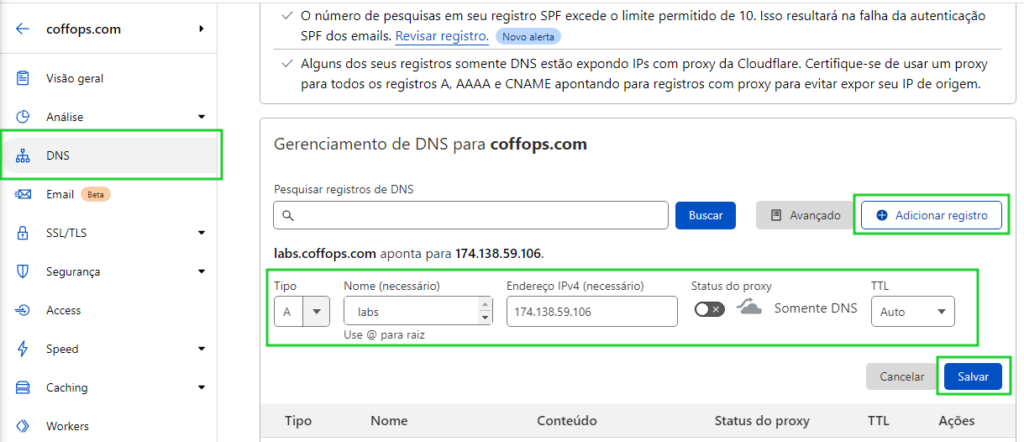
Em seguida precisamos configurar nosso domínio, apontando o labs.coffops.com para o IP 174.138.59.106!
Aqui como estamos usando a Cloudflare, na parte de DNS vamos adicionar um registro do tipo A apontando para o IP do nosso servidor, veja:
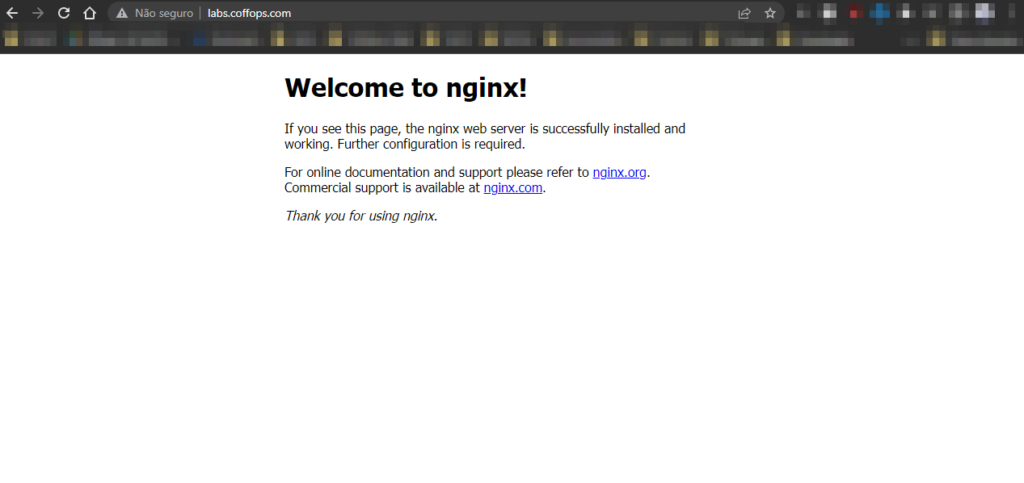
E agora, ao acessar o endereço http://labs.coffops.com vamos ter a seguinte tela:
Gerando Certificado SSL Grátis com Nginx e Lets’s Encrypt
Finalmente, agora que temos todo nosso cenário funcionando, vamos gerar nosso certificado SSL e para isso usamos o comando certbot –nginx, veja:
root@coffops-ssl-lab:/var/www/html# certbot --nginx
Saving debug log to /var/log/letsencrypt/letsencrypt.log
Plugins selected: Authenticator nginx, Installer nginx
Enter email address (used for urgent renewal and security notices) (Enter 'c' to
cancel): [email protected]

- - - - - - - - - - - - - - - - - - - - - - - - - - - - - - - - - - - - - - - -
Please read the Terms of Service at
https://letsencrypt.org/documents/LE-SA-v1.2-November-15-2017.pdf. You must
agree in order to register with the ACME server at
https://acme-v02.api.letsencrypt.org/directory
- - - - - - - - - - - - - - - - - - - - - - - - - - - - - - - - - - - - - - - -
(A)gree/(C)ancel: A

- - - - - - - - - - - - - - - - - - - - - - - - - - - - - - - - - - - - - - - -
Would you be willing to share your email address with the Electronic Frontier
Foundation, a founding partner of the Let's Encrypt project and the non-profit
organization that develops Certbot? We'd like to send you email about our work
encrypting the web, EFF news, campaigns, and ways to support digital freedom.
- - - - - - - - - - - - - - - - - - - - - - - - - - - - - - - - - - - - - - - -
(Y)es/(N)o: Y

Which names would you like to activate HTTPS for?
- - - - - - - - - - - - - - - - - - - - - - - - - - - - - - - - - - - - - - - -
1: labs.coffops.com
- - - - - - - - - - - - - - - - - - - - - - - - - - - - - - - - - - - - - - - -
Select the appropriate numbers separated by commas and/or spaces, or leave input
blank to select all options shown (Enter 'c' to cancel): 1
Obtaining a new certificate
Performing the following challenges:
http-01 challenge for labs.coffops.com
Waiting for verification...
Cleaning up challenges
Deploying Certificate to VirtualHost /etc/nginx/sites-enabled/site.conf

Please choose whether or not to redirect HTTP traffic to HTTPS, removing HTTP access.
- - - - - - - - - - - - - - - - - - - - - - - - - - - - - - - - - - - - - - - -
1: No redirect - Make no further changes to the webserver configuration.
2: Redirect - Make all requests redirect to secure HTTPS access. Choose this for
new sites, or if you're confident your site works on HTTPS. You can undo this
change by editing your web server's configuration.
- - - - - - - - - - - - - - - - - - - - - - - - - - - - - - - - - - - - - - - -
Select the appropriate number [1-2] then [enter] (press 'c' to cancel): 2
Redirecting all traffic on port 80 to ssl in /etc/nginx/sites-enabled/site.conf

- - - - - - - - - - - - - - - - - - - - - - - - - - - - - - - - - - - - - - - -
Congratulations! You have successfully enabled https://labs.coffops.com

You should test your configuration at:
https://www.ssllabs.com/ssltest/analyze.html?d=labs.coffops.com
- - - - - - - - - - - - - - - - - - - - - - - - - - - - - - - - - - - - - - - -

IMPORTANT NOTES:
 - Congratulations! Your certificate and chain have been saved at:
   /etc/letsencrypt/live/labs.coffops.com/fullchain.pem
   Your key file has been saved at:
   /etc/letsencrypt/live/labs.coffops.com/privkey.pem
   Your cert will expire on 2022-09-02. To obtain a new or tweaked
   version of this certificate in the future, simply run certbot again
   with the "certonly" option. To non-interactively renew *all* of
   your certificates, run "certbot renew"
 - Your account credentials have been saved in your Certbot
   configuration directory at /etc/letsencrypt. You should make a
   secure backup of this folder now. This configuration directory will
   also contain certificates and private keys obtained by Certbot so
   making regular backups of this folder is ideal.
 - If you like Certbot, please consider supporting our work by:

   Donating to ISRG / Let's Encrypt:   https://letsencrypt.org/donate
   Donating to EFF:                    https://eff.org/donate-le

 - We were unable to subscribe you the EFF mailing list because your
   e-mail address appears to be invalid. You can try again later by
   visiting https://act.eff.org.
Algumas observações do comando acima:
- A primeira vez que você roda ele pede seu endereço de email para enviar possíveis avisos de certificados que estão vencendo.
- Ele vai perguntar se você quer redirecionar todas as requests automaticamente para HTTPS, nesse caso eu marquei que sim!
Em seguida já podemos ver que nosso arquivo site.conf está diferente, veja:

Por fim, ao acessar o mesmo site novamente ele já está com HTTPS e redirecionando todas as requisições que são HTTP para HTTPS, veja:
E assim, terminamos esse tutorial e esperamos que você tenha entendido Como Instalar um Certificado SSL Grátis com Nginx e Lets’s Encrypt!
Você pode gostar também: Dicas de como configurar seu Nginx de forma mais segura